

An introduction to your child’s gastrostomy tube
What is a gastrostomy?
A gastronomy is a surgical procedure to make an opening in the stomach to insert a tube for nutritional support.
- The word gastrostomy is made up of two terms:
- “Gastro” means stomach
- “Ostomy” means opening
- Together “gastrostomy” means an opening into the stomach
- The inserted tube is often called a G-tube or GT
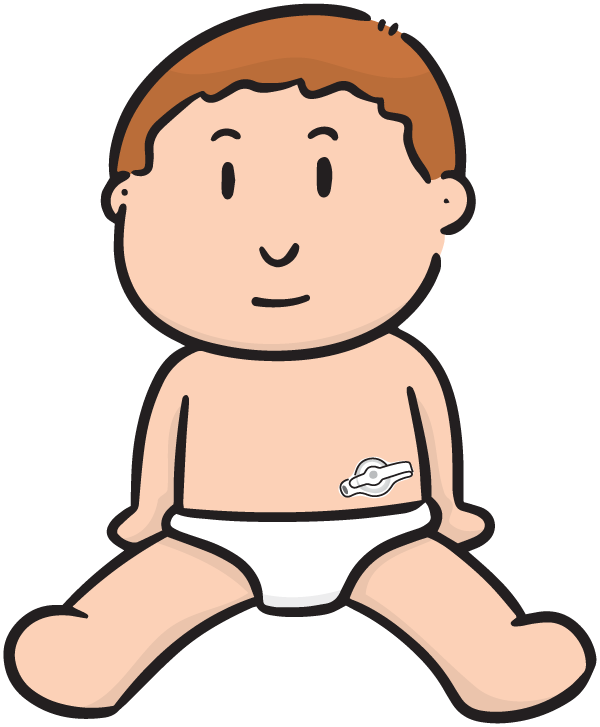
- The opening on the skin is called a “stoma”
- Sometimes called an “enteral tube” because it delivers food and liquids into the digestive system or intestine
Guide to your child’s gastrostomy tube

On this page:
- Why does my child need a gastrostomy tube?
- What is a G-tube?
- How is the gastrostomy tube placed?
- What will happen after surgery?
- When we get home, when should I call the doctor?
- Gastrostomy tubes
- Low Profile Device (MIC-KEY Button or Mini-One)
- Extension Sets and Cleaning Procedures
- Percutaneous Endoscopic Gastrostomy Tube (PEG tube)
- Tube Feeding
- Bolus Feeding by gravity with syringe
- Bolus Feeding by Gravity Bag
- Enteral Pump Feeding
- Venting the Tube
- Medication Administration
- Tips for Adjusting to a Gastrostomy Tube
- Troubleshooting Your G-tube
- FAQ’s
- G-Tube Home Emergency Kit
- Important Info / Who to call for help
- Important Definitions
- To provide food when he/she cannot eat enough to grow and be healthy
- To give medications
- To give liquids
- To release air or gas that may collect in the stomach (also called “venting”) or to drain the stomach
What is a G-tube?
- A soft flexible tube that is surgically placed into the stomach through a small opening in the skin
- The G-tube can stay in place until it is no longer needed
How is the gastrostomy tube placed?
- In the operating room by a surgeon or pediatric gastroenterologist
- Usually your child is in the operating room for 1 to 2 hours
What will happen after surgery?
- Your child will have nothing to eat or drink for up to 24 hours after surgery but will have fluids through an IV
- Your child may feel sore for a day or two and the area may be swollen
- We will give your child medications for pain
- There may be some sutures near the G-tube
- You will start to learn about caring for the G-tube right away
- We will clean the skin around the tube with saline and gauze or cotton tip applicators at first
- The new site may have some drainage until it heals
- A tract connecting the stomach to the outside skin develops around the tube as the stoma heals
- Your child may only have sponge baths for the first 2 weeks
Your child’s nurses will help you learn and practice how to care for the G-tube. We want you to feel comfortable with these new skills before you go home. The case manager will arrange for the tube feeding supplies you need.
When should I call the doctor?
- If you are worried about how the G-tube looks or is working, call the pediatric gastroenterologist or surgeon
- When to call the surgeon or pediatric gastroenterologist:
- If the G-tube falls out and it is less than 2 months since surgery
- If the G-tube falls out before the first tube change (follow the instructions for the emergency tube and call the surgeon)
- If the G-tube falls out and you are not able to get a new tube back in or if the hole has closed
- If there is any bleeding or lots of redness around the G-tube
- If there are any large bumps under the skin around the G-tub
For gastrostomy tubes placed by pediatric surgery:
Call the pediatric surgery clinic during clinic hours. After hours, call the hospital operator (916-734-2011) and ask for the pediatric surgeon on call.
For gastrostomy tubes placed by pediatric gastroenterology:
Call the pediatric gastroenterology advice line. After hours, call the hospital operator (916-734-2011) and ask for the pediatric gastroenterologist on call.

There are several types of gastrostomy tubes. The doctor will choose the best one for your child. It may be necessary to change the type or size of the G-tube as your child grows and his/her medical needs change.
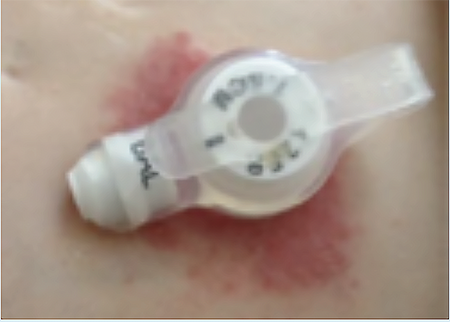
- This is a skin level device
- It is inserted into the stomach through the abdominal wall
- There is an inflatable balloon at the end of the tube inside the stomach that is filled with water to hold the G-tube in place
- The balloon port is the little opening labeled “BAL” on the side of the G-tube
- An extension set is attached to the key shaped opening to give fluids and feedings
- When not in use, the feeding port is covered with an attached cap
- An anti-reflux valve is located inside the G-tube to help prevent the stomach contents from leaking out of the G-tube.
- The extension set will open the valve.
- Flush thoroughly with water to keep the valve clean and working properly.
A small opening is made in the skin of the abdomen. Another small opening is made in the stomach wall. The tube is passed through the openings into the stomach. This heals as a tract somewhat like the tract that forms with a pierced ear. When the tract has healed, the G-tube can be removed and replaced easily. However, the tract will close quickly if the G-tube falls out and is not replaced.
Post-op care
- The area around the gastrostomy may be tender for several days. Discomfort usually can be treated with pain medications
- A small amount of drainage around the G-tube is normal
- There may be a dressing under the G-tube to prevent tube movement
- Do not turn the G-tube until it is healed
- Sponge bathe for the first two weeks after placement
Home Care
- Keep the G-tube and the stoma (the skin around the tube) clean and dry
- Clean the skin around the G-tube 1 to 2 times each day with soap and water
- The G-tube is replaced about every 3 months.
- At your follow-up appointment, the clinic staff will teach you how to change the G-tube at home, and how and when to check the water in the balloon.
- A dressing under the extension set can help stabilize and prevent movement, but is not required.
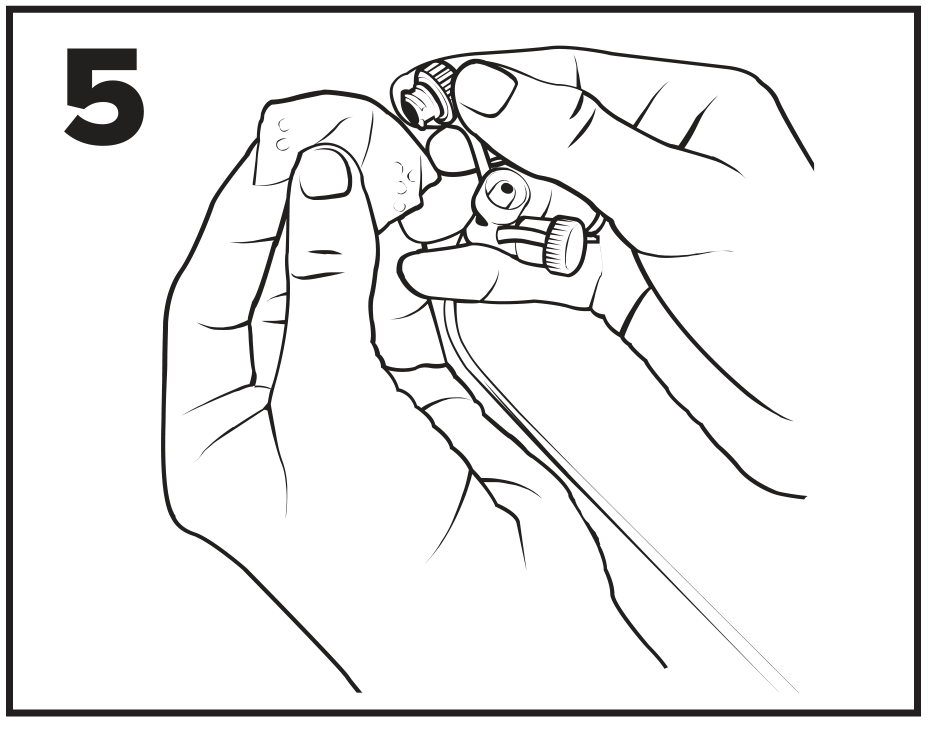
Extension sets
- Remove extension set from GT when not in use
- If your child is receiving feedings over more than an hour, secure the extension set to the skin with tape to prevent pulling on the G-tube
- Extensions sets are disposable and should be changed every week
- The supply company providing your G-tube supplies should send you 4 to 5 sets every month
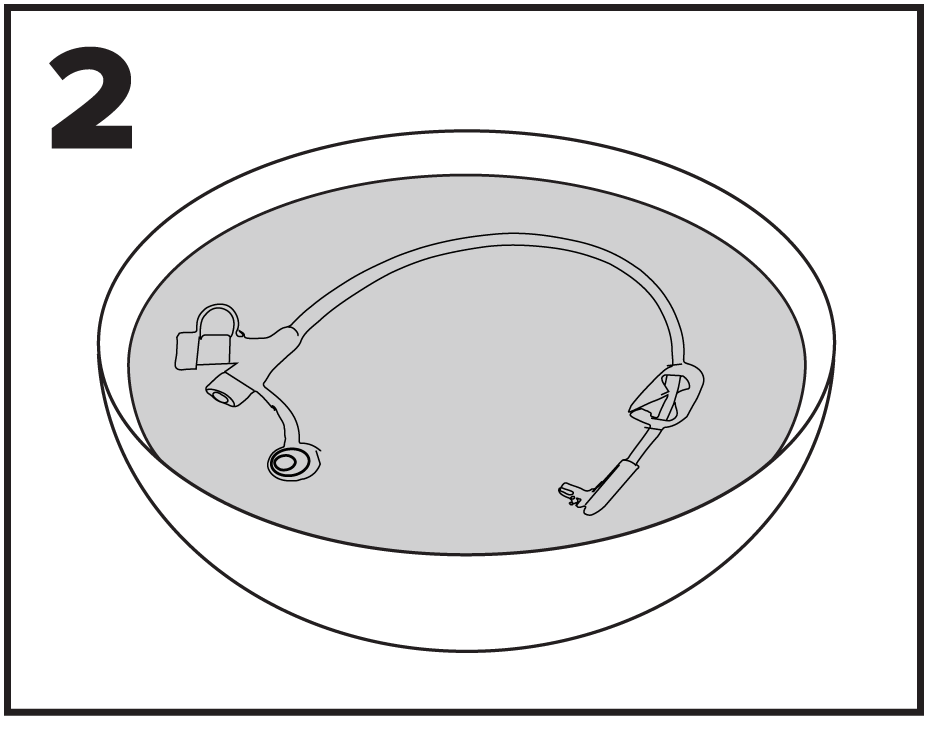
- Clean the extension set with soap and water after every use
- Do not use if clogged or dirty
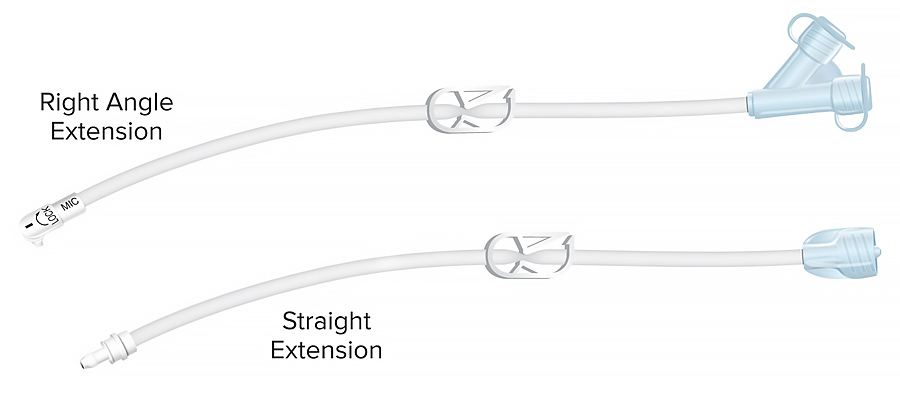
- The extension set may be available in different lengths (12 or 24 inch)
- The most commonly used extension for feeding has a right angle connector and a y-port
- The straight bolus extension set is useful for venting the G-tube or for large volume bolus
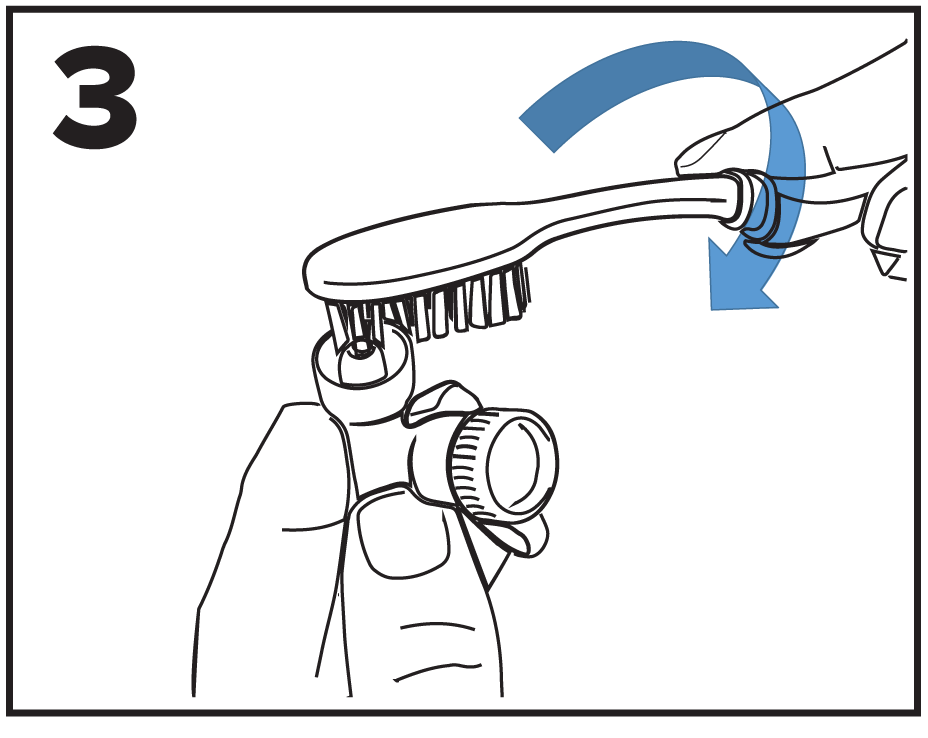
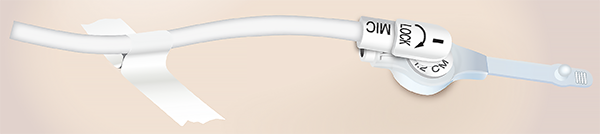
How to attach the extension set:
- Align the black line of the extension set with the black line on the feeding port.
- Insert the connector into the feeding port.
- Rotate it clockwise to lock it in place.
Low Profile Feeding Tubes Extension Sets
Tips for keeping ENFit feeding tube ports clean. Inspect before you connect!
Priming Feeding Sets - Stop priming before fluid reaches the end of the tube.

ENFit Syringe Draw Up - Wipe medication and nutrition from tip/outer threads, keep fluids out of dead space before connecting to feeding tube.

For best results, follow these instructions to clean tubes at least once a day or whenever material is visible
Tube Cleaning Supplies & Terms

Note: Use a disposable brush or follow manufacturer’s instructions if using ENFit specific cleaning brush.
Steps

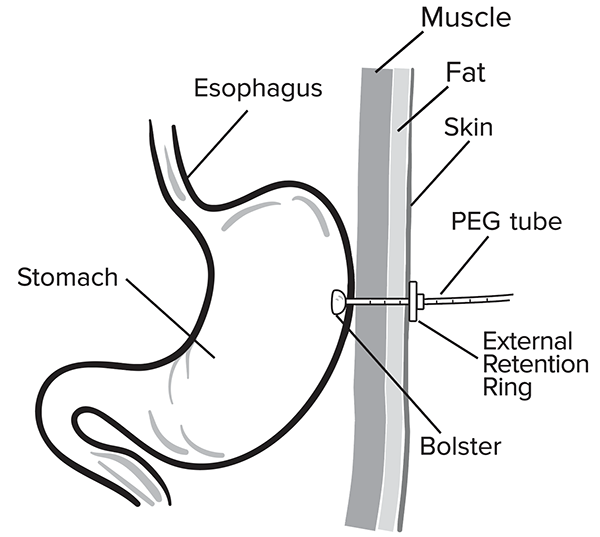
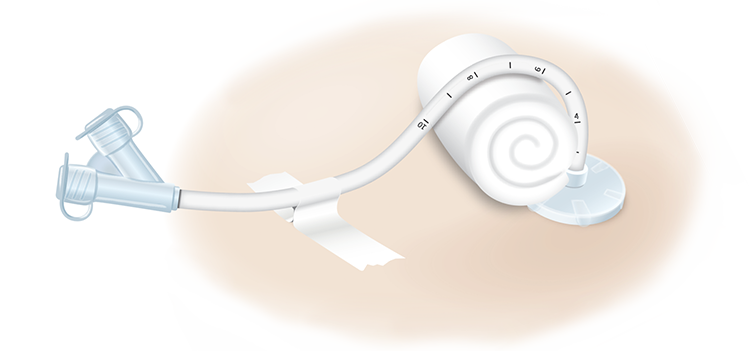
- This tube is usually placed by a pediatric gastroenterologist or interventional radiologist
- The PEG tube is changed after about 3 months by the specialist and replaced with another type of G-tube (usually a MIC-KEY)
- Inside the stomach is a dome-shaped bumper that sits against the stomach wall to hold the tube in place
- On the outside against the skin is a retention ring that keeps the PEG tube in place
Post-op care
- The area around the gastrostomy may be tender for several Discomfort usually can be treated with pain medications
- A small amount of drainage around the PEG tube is normal
- There is usually no dressing under the retention ring
- The PEG tube is turned two times a day
- The centimeter marking at the skin is checked every day (see picture)
- Sponge bathe for the first two weeks after placement
Home care
- Clean the skin under the retention ring 1 to 2 times a day with soap and water
- Do not use any dressings or gauze under the retention ring
- Make sure the retention ring sits on the skin without indentations from the ring
- Secure the PEG tube at all times to the abdomen with tape about 2 to 3 inches away from the insertion You may use a gauze bolster to support the tube if needed.
- Every day, check the centimeter marking on the PEG tube where it enters the skin. The marking should be the same every day
- If the centimeter marking at the skin is a bigger number, gently pull the PEG tube back to the proper marking and adjust the retention ring
- If the centimeter marking at the skin is a smaller number, the PEG tube may be out of Call your specialist or go to the Emergency Room. Do not give anything through the tube.
Place your child in a comfortable position during feedings.
You may:
- Hold your child
- Place your child in a car seat, stroller, wheelchair, chair or high chair
- Have a second person help you with the feeding
- Place your child so his/her head is higher than the rest of the body
You and your child’s healthcare team will come up with a feeding plan that meets your child’s nutritional needs and is also most appropriate for his/ her medical condition.
Feedings usually begin the day after surgery. The initial feed will be a small amount to make sure your child’s stomach is ready for feeds.
Then, the amount of formula is gradually increased to what will be given at home.
Although formula contains water, it is usually not enough for your child’s needs. The feeding plan will include additional water to be given either before, after or in between feedings.
It is also recommended to flush the G-tube/extension set with 5 to 10 mLs of water before and after feedings to keep tube from clogging.
There are three ways that tube feedings may be given:
- Bolus by gravity with a syringe
- Bolus by gravity with a feeding bag
- Bolus, continuous or cycled by pump with a feeding bag
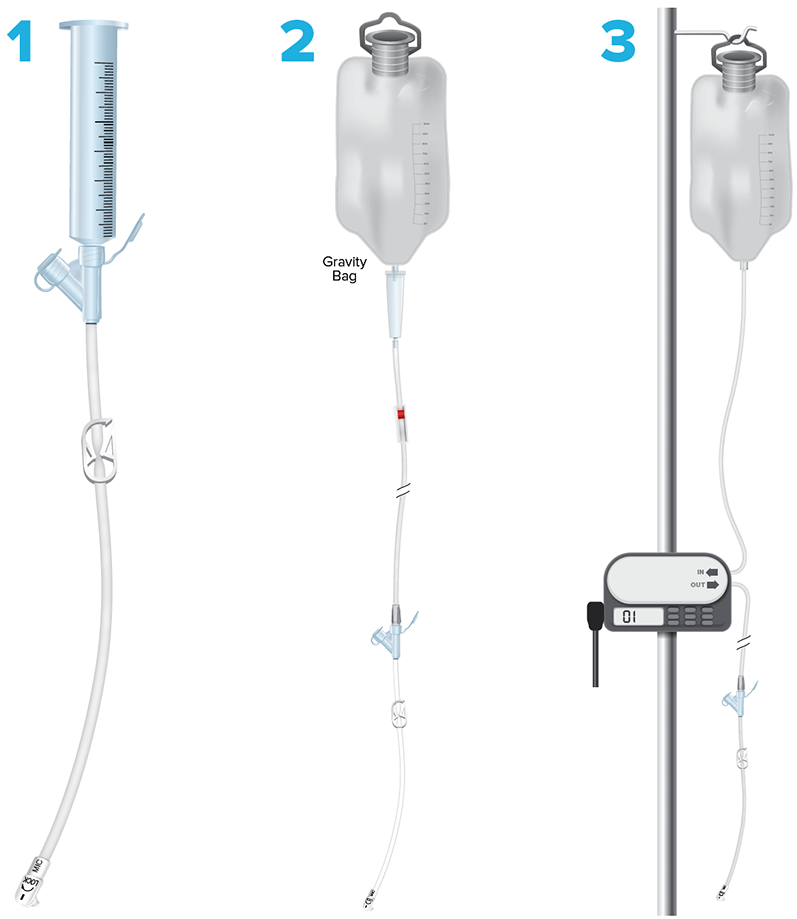
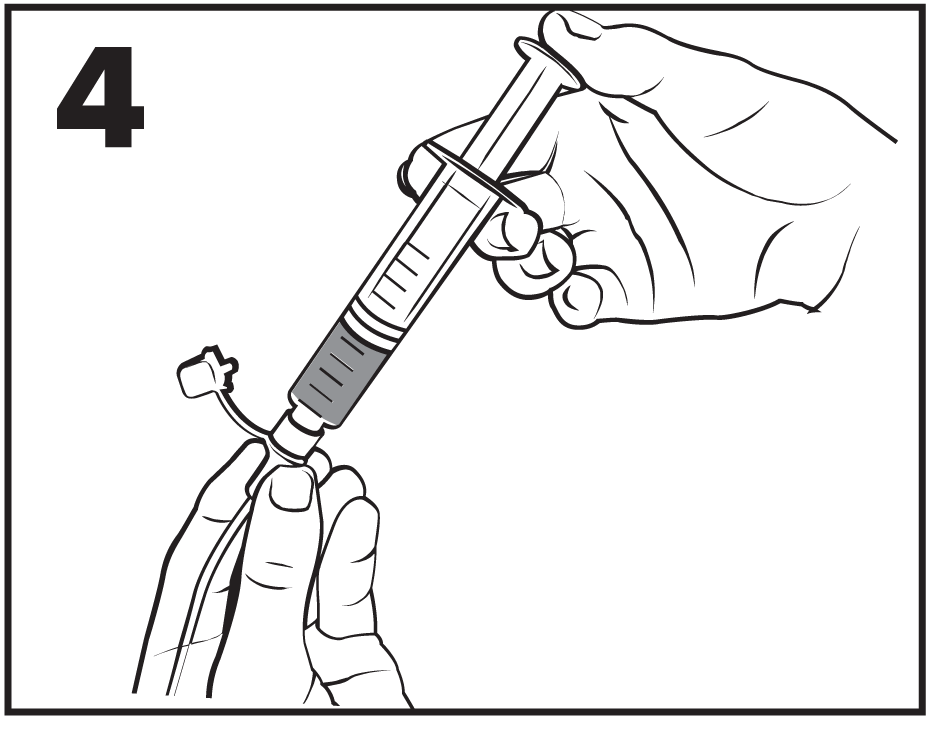
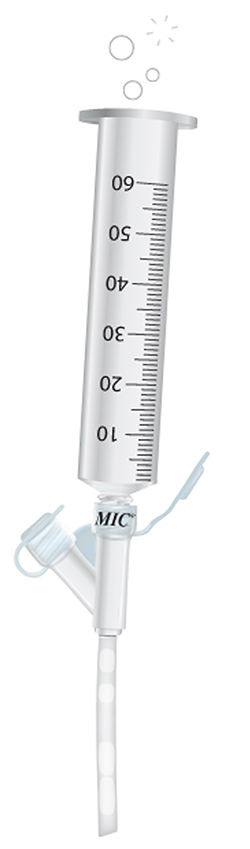
1. Bolus Feeding with Syringe by Gravity
- With this method, formula flows out of the syringe into the feeding tube and the stomach
- This method may also be called gavage feed
- The bolus is given like a meal, usually over 20 to 30 minutes
- Larger amounts can be given over a short period of time
Supplies:
- Formula (remember to rinse off the top of the unopened can)
- Water
- 60 mL syringe with plunger removed
- 5 or 10mL syringe for water flush
- Extension set (if used)
Steps for feeding:
- Wash your hands
- Attach extension set (if used)
- Make sure G-tube or extension set is clamped
- Attach syringe to G-tube or extension set
- Pour desired amount of formula into syringe
- Unclamp extension set or tube
- Allow formula to flow in by gravity
- Add water to syringe for flush at end of feeding
- When feeding is finished, clamp tube
- Disconnect and wash extension set and syringe, allow to air dry
- Refrigerate any unused formula and use within 24 hours
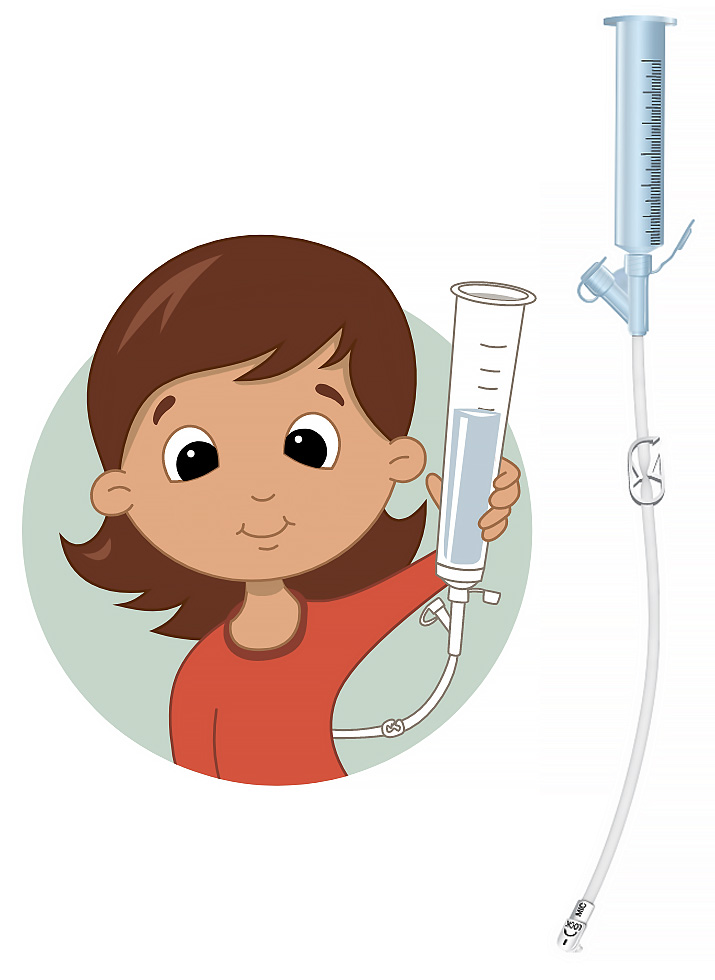
- The higher you hold the syringe, the faster it flows
- If formula doesn’t flow, push gently with the Do not force
- Add more formula to the syringe before it empties to prevent unnecessary air from entering the stomach
- Adjust the flow rate by raising or lowering the syringe in relation to the child’s stomach
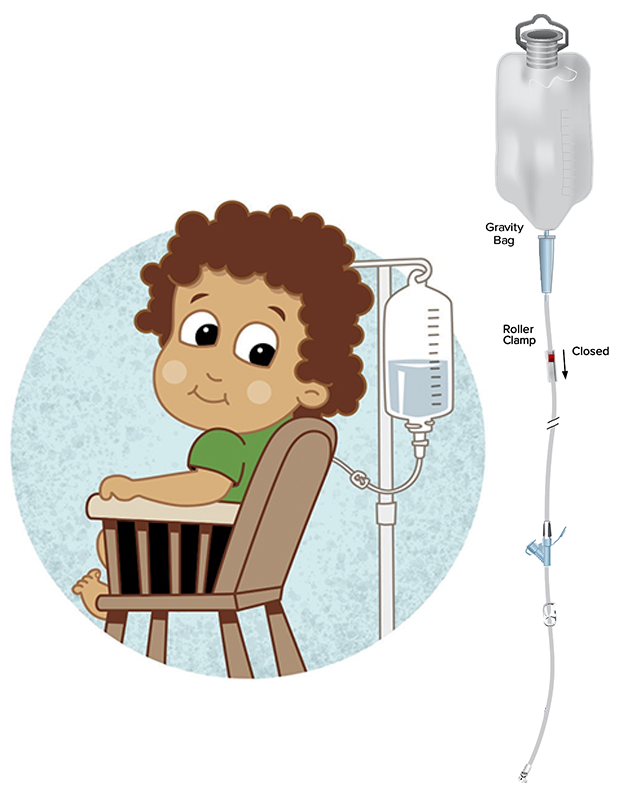
2. Bolus Feeding by Gravity Bag
- With this method, formula flows out of a bag into the feeding tube and the stomach
- The bolus is given like a meal, usually over 20 to 30 minutes
- The bag hangs above the child
- The roller clamp on the bag is adjusted to control the flow of the formula
- The feeding bag is changed every day
Supplies:
- Formula (remember to rinse off the top of the unopened can)
- Water
- Gravity bag
- 5 or 10 mL syringe for water flush
- Extension set (if used)
Steps for feeding:
- Wash your hands
- Hang bag 18" or higher above your child’s stomach
- Make sure roller clamp on bag is closed (do not attach bag to your child until primed with formula)
- Open bag and pour in formula, close top of bag
- Prime tubing by slowly opening roller clamp and allow formula to flow until formula reaches the end tip of the tubing
- Close roller clamp
- Attach extension set to G-tube (if used)
- Make sure G-tube or extension set is clamped
- Attach gravity bag tubing to G-tube or extension set
- Unclamp extension set or G-tube
- Open roller clamp to allow formula to flow in by gravity
- Control how quickly the formula flows in by partially closing or opening the roller clamp
- When feeding is finished, clamp G-tube or extension set
- Flush with recommended amount of water
- Disconnect and wash extension set and bag, allow to air dry
- Refrigerate any unused formula and use within 24 hours
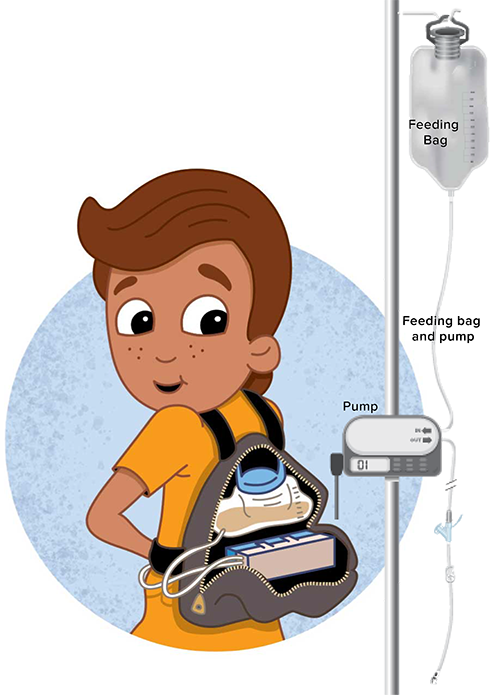
3. Enteral Pump Feeding
With this method, a machine pumps formula from a bag through the G-tube into the stomach. Teaching about the pump will be arranged with the enteral supply company before your child is discharged from the hospital.
There are multiple ways of giving feedings with a pump:
- Bolus: Feeding given over 30 minutes to several hours
- Continuous: Feedings given over a longer time period, for example, overnight or 24 hours per day
- Cycled: Feedings given over a longer time period with breaks in between
Supplies:
- Formula (remember to rinse off the top of the unopened can)
- Water
- Pump and feeding bag
- 5 or 10 mL syringe for water flush
- Extension set (if used)
Steps for feeding with pump:
- Wash hands
- Fill feeding bag with formula
- Connect feeding bag to pump and prime according to pump instructions
- Program pump settings as instructed
- Attach extension set (if used) to G-tube and flush with water
- Attach pump tubing to G-tube or extension set
- Unclamp G-tube or extension set
- Start pump and watch to make sure feeding has started properly
- For bolus or overnight feeding:
- At the end of the feeding, flush G-tube/extension set with water
- Disconnect and wash extension set, and allow to air dry
- The enteral supply company will instruct you on how to care for the feeding bag
- Use a new feeding bag every 24 hours
- For continuous or cycled feedings:
- The enteral supply company will instruct you on how to care for the feeding bag
- Use a new feeding bag every 24 hours
- Disconnect and wash the extension set (if used) every day before setting up a new feeding bag
- Change extension set (if used) weekly
- Refrigerate any unused formula and use within 24 hours
Steps to vent tube:
- Wash hands
- Remove plunger from 60 mL syringe
- Attach syringe (without plunger) to clamped feeding tube or extension set
- Hold syringe above the level of your child’s stomach
- Unclamp tube or extension set
- Press lightly on the stomach or lift the legs
- Excess gas will bubble up into the syringe. It is normal for formula/stomach contents to rise into the syringe
- If liquid is seen in the syringe, allow it to flow back by gravity before clamping the tube/extension set and removing the syringe
“Venting”
Your child may get uncomfortable due to excess air or gas in his/her stomach. Venting allows air to escape from the stomach. Some children may need venting more frequently and/or during feedings. Your healthcare team may also recommend use of a Farrell Bag System.
You may vent the tube:
- before and after feeds
- with diaper changes
- as needed
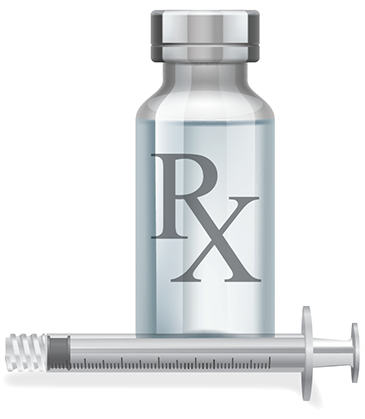
Steps for medication administration

- Wash hands
- Pull up medications in separate syringes
- If tubing or extension set has 2 ports, always insure that they are capped to prevent meds from spilling
- Prime extension set with water
- Add extension set (if used) to G-tube
- Attach syringe with medication to G-tube/extension set port
- Unclamp G-tube/extension set
- Give medication through medication port. Medication should go in easily; do not force
- Clamp between medications and water flushes
- Flush with a small amount of water (1 to 2mL) in between each medication
- Flush afterward with recommended amount of water
- Remove and wash extension set (if used)
- Wash syringes with soap and water and allow to air dry
Medications are the most common cause of a clogged tube
- Only give one medication at a time
- Flush with water between and after meds
- Use liquid medications whenever possible
- Check with MD or pharmacist before crushing pills
- If crushing pills, do so into a fine powder
- and mix with warm water to dissolve
- If medications are thick, dilute in water
- Pull up medications in separate syringes
- Wash extension sets after each use
- Throw away the extension set if it becomes stiff or cannot be cleaned well
- Change extension sets at least weekly

- The feeding plan you start with will change over time
- The healthcare team will work with you to develop a plan that fits your family’s needs and fits with your child’s school, appointment, and sleep schedule
- Activity- most activities including tummy time are allowed
- Ask your team what to do if your child misses a feed. They can help determine where is the best place to fit it in
- Be prepared: always make sure you have enough formula and supplies
- If your child is not taking food by mouth, it is still important to keep the mouth clean
- Brush 2 times per day
- Floss 1 time per day
- For infants, wipe the mouth and teeth with a soft moist cloth at least once a day
- Your child needs to keep the connection between the mouth being used and the stomach getting full. If your child is allowed to have food or liquids by mouth, it is important to offer an oral feeding each time your child gets a tube feeding. If your child is not able to eat by mouth, oral stimulation (or a pacifier for infants) can be offered during tube feedings
- Talk to your healthcare team about other ways to provide for your child’s oral development

Preventing Infection:
- Wash your hands every time you handle the tube, formula, or supplies
- Wash out the bag or place it in the refrigerator between feeds as instructed by your enteral supply company
- Use a new bag every day
- Good oral hygiene prevents bacteria from moving down the airway and causing pneumonia
- Raise the head of the child’s bed to prevent reflux
Securing the tube
- Tape
- Pin to clothes with tape and tabs
- Dress infants in onesies
- Tuck shirts into pants for older children
- Ace wrap
Newly placed G-tube falls out
Possible Problem
- Accidental dislodgement
- Balloon malfunction
What to do
- Don’t panic
- See emergency kit
- Notify your doctor immediately
- Do not feed through the emergency tube
How to avoid
- Secure extension set in use
- Remove extension set when not in use
- Cover tube so it doesn’t get pulled
Redness, irritation, pain, bleeding (a small amount of drainage is normal)
Possible Problem
- Leaking of formula around tube
- Friction or pulling on the tube
- Infection
What to do
- Make an appointment to see your doctor
- Use barrier cream on the skin around stoma
How to avoid
- Wash hands every time you touch the tube
- Check the skin every day
- Clean the skin 1 to 2 times each day
- Keep any dressing clean and dry
- Notify your doctor if drainage is thick, yellow/green, or foul smelling or if redness /irritation spreads
Leaking at the site
Possible Problem
- Stomach is too full
- Tube fit is too loose
- The balloon has lost water
- The balloon is not up against the stomach wall
What to do
- Slow the feeding rate
- Check amount of water in the balloon
- Use barrier cream to protect skin
- Use dressing to absorb drainage
(short term solution only)
How to avoid
- Vent G-tube
- Make sure balloon has right amount of water
Vomiting/retching and/or Distended abdomen
Possible Problem
- Feeding intolerance
- Too much air or gas
- Stomach too full
What to do
- Vent G-tube before and after feeds or medications
- Slow feed
- Decrease amount given each feeding (may need to give an extra feed to give same daily amount)
How to avoid
- Vent G-tube (see page 20)
- Watch for early cues that your child is uncomfortable
- Use Farrell bag if instructed
Clogged G-tube
Possible Problem
- Medication/Formula stuck in G-tube
What to do
- Attach syringe with warm water
- Use slow Push-pull method to try to unclog G-tube
- Repeat every 10-15 minutes
- Call your doctor if you are unable to clear the clog
How to avoid
- Give medications correctly
- Flush well before and after medications
- See page 21 for tips to avoid clogging G-tubes
Excess pink or red tissue around the stoma
Possible Problem
- Hypergranulation tissue
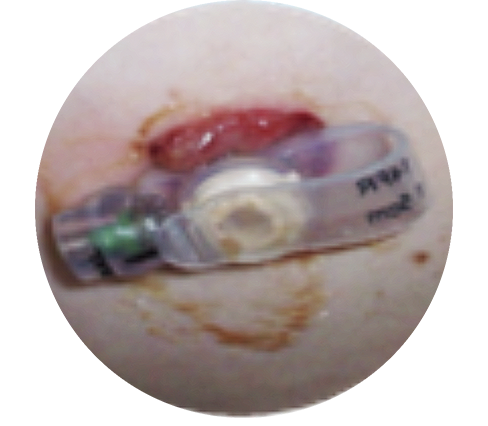
What to do
- Not dangerous
- Is very common
- The doctor may decide to treat
How to avoid
- Stabilize G-tube/extension set at all times to decrease friction
- Prevent pulling on G-tube
- Keep stoma clean and dry
- Clean with soap and water every day
Can my child swim or take a bath?
- After 2 weeks, the gastrostomy tract should be healed enough for your child to take a bath or swim in chlorinated water (pool)
- After 4 weeks, your child can swim in lakes, rivers or the ocean
- Clean the gastrostomy site immediately after swimming
- Water may leak into your child’s This is ok for most children
- You may cover the G-tube with a large Band-Aid if desired
Can my child lay on the gastrostomy?
- Yes, after the site is fully healed and no longer tender
- Infants can lie on their stomachs for tummy time
- Older children can sleep on their stomachs
The opening will start to close within 2 hours, and may be completely closed by 24 hours, so it is important to have a kit ready to use.
What to do if the G-tube falls out:
Don’t panic. Call the doctor immediately.
If the G-tube is newly placed, and you have not yet been seen in the pediatric gastroenterology (GI) clinic, call pediatric surgery 916-734-7844. After 5 p.m. or on weekends or holidays, call the Hospital Operator at 916-734-2011 and ask for the on-call pediatric surgery to be paged.
If you have been seen by a pediatric gastroenterologist, but have not yet learned how to replace the G-tube, call the pediatric GI clinic at 916-734-5912. After 5 p.m. or on weekends or holidays, call the Hospital Operator at 916-734-2011 and ask for the on-call pediatric gastroenterologist to be paged.
If you are unable to reach the doctor by phone, go the nearest emergency room.
Do Not Give Feedings or Medications Through the Emergency Tube
- 2 replacement emergency tubes will be in your emergency kit.
- One tube is the same size as your child’s gastrostomy tube and the other tube is one size smaller.
- The emergency tube is inserted to keep the stoma and gastrostomy tract open
- Always carry the kit with your child
- Never force the tube into the stoma. Try the smaller size tube if needed.
- Do not take more than 10–15 minutes to try to insert the Emergency tube
- Do not inflate the balloon on the emergency tube
Supplies:
- 2 tubes, 1 the size of the current G-Tube and 1 a size smaller
(this tube is often called a Foley) - Water soluble lubricating jelly
- Tape
- Catheter plug

Steps:
- Do not panic!
- Wash your hands
- Put a small amount of water soluble lubricating jelly on the end of the emergency tube
- Gently insert the emergency tube 2-3 inches into the stoma\
- Tape the tube to the skin so that it won’t fall out
- Do not give ANYTHING (formula, water, or medications) through the emergency tube
- Call the doctor or go to the nearest emergency room
Important points
- Be sure your child’s teachers, school nurse, and PE teacher know about the gastrostomy tube
- Always carry your emergency kit
- Do not use meds that are out of date
Call your doctor if your child has signs and symptoms of dehydration:

- No urine in 12 hours for toddlers
- No urine in 8 hours for infants
- Crying without tears
- Very dry mouth or cracked lips
- Sunken soft spot (infants less than 1 year)
- Your child is more sleepy than usual
- Your child feels dizzy
- Abdomen: Area of body below lungs that contains stomach, intestines, liver and other organs
- Aspiration: Accidentally inhaling liquid (such as stomach contents or formula) into the windpipe and/or the lungs
- Bolus: A large amount of formula delivered through the G-tube
- Enteral nutrition: Giving food directly into the stomach or intestines through a feeding tube
- Esophagus: The muscular tube that connects the mouth to the stomach
- Fontanel or soft spot: Area on a baby’s head where skull has not yet grown together
- Flush: An amount of liquid used to clear formula or medication from the G-tube into the stomach
- Gravity: A force which allows liquids to flow from a higher point to a lower point
- Prime: To fill up tubing with liquid
- Rate: How fast the formula is to be given; for example, an amount of milliliters per hour
- Reflux: Movement of stomach contents up into the esophagus
- Stoma: Surgical opening through which a feeding tube enters the body
- Tract: Path from the stomach to the abdominal wall that forms around the gastrostomy tube
- Vent/Venting: Letting the air or gas out of the stomach