

Patient Education A-Z
Pediatric Diabetes
Insulin for children
Types of insulin
Basal insulin
Basal insulin is your 24-hour, long-acting insulin and is usually taken once per day. Take it at the same time every day. It will keep your blood glucose in range if you don’t eat.
Rapid-acting insulin
Rapid-acting insulin is taken every time you eat carbohydrates (nutrition dose) and/or when blood glucose is above goal (correction dose). Your total dose before each meal will be nutrition + correction dose. Rapid-acting insulin should be given before EVERY meal or carbohydrate-containing snack.
- The amount of rapid-acting insulin you take depends on your blood glucose (correction dose) and the amount of carbohydrate you eat (nutrition dose).
- If your blood glucose is above the target goal, you will need a “correction dose” of rapid-acting insulin.
- Your “insulin-to-carbohydrate ratio” is the number of units of rapid-acting insulin you need per gram of carbohydrate. This is how you calculate your nutrition dose.
To calculate how much rapid-acting insulin to take:
- Check your blood glucose. Compare to your correction scale to determine the correction dose.
EXAMPLE: Correction dose = 1 unit for every 50mg/dL (or 50 "points") blood glucose over 150mg/dL
BG=180
Correction dose = 1 unit - Count the grams of carbohydrate in your food. Divide the total carbohydrate grams by your insulin to carbohydrate ratio to determine the nutrition dose.
EXAMPLE: Insulin to carbohydrate ratio = 1 unit for every 10 grams of carbohydrate
Total carbohydrates = 30g
Nutrition dose = 30 grams / 10 = 3 units - Add the correction dose to the insulin to carbohydrate dose. This is your total dose of rapid-acting insulin.
EXAMPLE: Correction dose (1 unit) + Nutrition dose (3 units) = 4 units
The “three-hour rule” for rapid-acting insulin (aka "Insulin Stacking")
Rapid-acting insulin begins to work about 15 minutes after injection, peaks in about 1 hour, and continues to work for 2 to 4 hours. The three-hour rule prevents “insulin stacking” and a low blood glucose (BG) or hypoglycemia.
When eating carbohydrate, always take rapid-acting insulin to cover the carbohydrate you are eating, no matter how recently you last took insulin. If you took insulin less than 3 hours ago, use only your insulin to carbohydrate ratio to calculate your insulin dose.
For example: Ray’s insulin to carbohydrate ratio is 1 unit of rapid-acting insulin (Novolog, in this example) for every 15 grams carbohydrate. His correction dose is 1 unit of Novolog for every 50 mg/dL over 150 mg/dL.
How to administer insulin in children
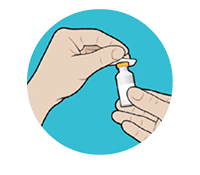
Step 1
Clean the top of the vial with an alcohol pad, then remove the cap from the syringe needle.
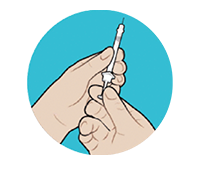
Step 2
Draw air into your syringe—an amount equal to the units of insulin you'll be injecting. To do so, pull back the syringe's plunger until its black stopper reaches your insulin dose amount on the syringe barrel. So if you will be taking 6 units of insulin, pull back the plunger until the stopper hits the 6 etched onto the barrel.
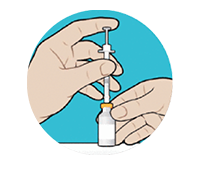
Step 3
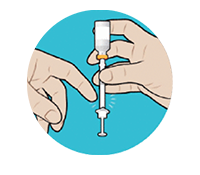
Put the vial on a flat surface and hold it. Insert the syringe into the vial, and press down on the plunger to inject the air from Step 2 back into the vial.
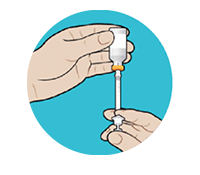
Step 4
With the syringe still in the bottle, turn the vial and syringe upside down. The tip of the needle should be fully covered by insulin.
Step 5
Make air bubbles less likely by slowly pulling down on the plunger. Draw insulin past your dose. Tap the syringe a few times so any bubbles rise to the top.
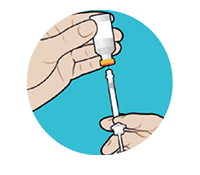
Step 6
Without removing the syringe from the vial, slowly push the plunger until the edge of its black stopper reaches the number of units in your dose, as marked on the syringe. If you see any bubbles, push all that insulin back into the vial and repeat these steps until no bubbles are present.
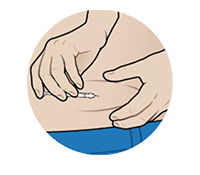
Step 7
Identify an injection site. Pinch up a bit of skin (if necessary). Insert the needle at a 90-degree angle. Hold the needle in the skin for 5 seconds to ensure there is no leakage.
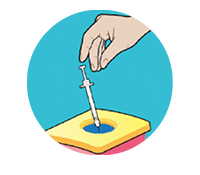
Step 8
Dispose of your syringe and needle in a sharps container.
Step 1
Wash and dry your hands.
Step 2
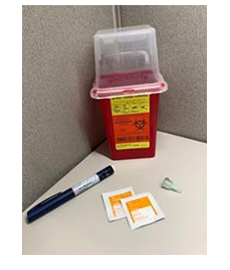
Arrange your supplies: sharps container, alcohol wipes, insulin pen and needle.

Step 3
Remove the pen cap and wipe the stopper using an alcohol wipe.
Step 4
Remove the seal and push the new needle straight onto the pen.
Step 5
Screw needle on tight.
Step 6
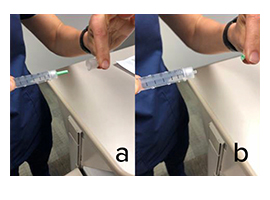
Remove the outer shield (a), and then remove the inner shield (b).
Step 7
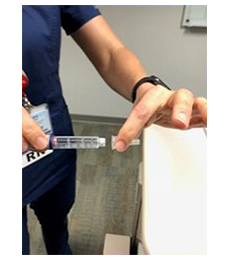
Check the flow of the medication by dialing two units. With the needle facing up, press the thumb button until you see a drop of medication. If necessary, repeat until you see a drop of medication.
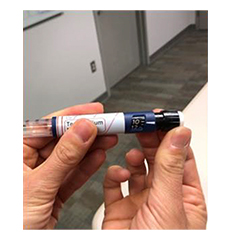
Step 8
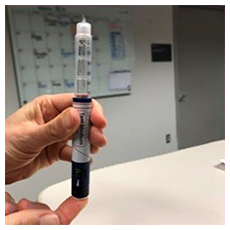
Dial your medication dose.
Step 9
Clean a small area of skin using an alcohol wipe. Insert needle.
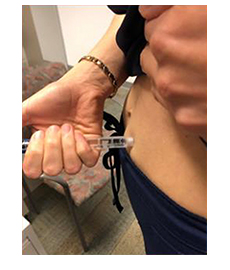
Step 10
Press the thumb button down. Post injection, count for ten (10) seconds before removing the needle from your skin.
Step 11
Throw the needle away after one use. Use a safe sharps container.
Insulin injections and sites
Insulin injections
- Do not mix basal/24-hour insulin with any other insulin.
- Rotate the spot where you give your insulin to prevent swelling, lumps, and scar tissue.
- Inject insulin into fatty tissue.
- After injection, wait 5-10 seconds before removing the syringe (needle)/insulin pen from your body.
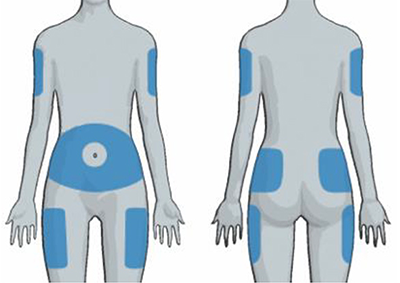
Injection sites
- Abdomen (stomach): Stay 2 inches away from the belly button or scars. Insulin is absorbed the best from the abdomen.
- Arms: Measure one hand width down from the shoulder and one hand width up from the elbow. Use the fleshy outer surface.
- Legs: Measure one hand width down from the groin and one hand width up from the knee. Use the top and outer part of the leg, staying away from the inner part of the thigh.
- Buttocks: Use the upper outer area.
Tip: Injecting cold insulin may sting. If you store your insulin in the refrigerator, warm it to room temperature before injecting.
Insulin Storage
- Keep unopened bottles/pens of insulin in the refrigerator or in a cool place (less than 86 degrees Fahrenheit).
- Open bottles/pens of insulin may be stored at room temperature (less than 86 degrees Fahrenheit) and away from direct sunlight for up to one month.
- NEVER store insulin in the freezer.
- Write the date on the bottle/pen when it is opened. Expiration dates of insulin will vary. Check the product instructions or ask the pharmacist for information about insulin expiration.
Disposal of Needles and Syringes
As of September 1, 2008, state law (Section 118286 of the California Health and Safety Code) made it illegal to dispose sharps waste in the trash or recycling containers. All sharps waste must be transported to a collection center in an approved sharps container.
For information about sharps disposal locations and take-back programs, visit or call:
safeneedledisposal.org
800-643-1643
Different cities and counties have different sharps disposal options:
- Some sharps disposal programs allow needles, syringes, and lancets to be placed into hard-sided containers (such as a bleach bottle) and labeled “sharps”
- Other programs require an actual sharps container to be used and may provide the container
- Some programs allow for mailing sharps waste for disposal
Local enforcement agency contacts:
| County | Department | Telephone |
|---|---|---|
| El Dorado | Environmental Management | 530-621-5300 |
| Sacramento | Environmental Health | 916-875-8468 |
| Yolo | Planning and Public Works | 530-666-8852 |
| Placer | Western Placer Waste Management Authority | 916-543-3960 (Roseville) 530-885-3735 (Auburn) |